Maintain a below 25degree celsius temperature with very bright light. Keep everything moist.
Tuesday, March 27, 2018
Lithops Seed Growth
Lithops come up fast (2-14 days) because they do not get many opportunities in the wild. When it rains they have to get a root down as far as possible as quickly as possible before the water evaporates. I think its a case of the quick or the dead.
Sunday, March 25, 2018
How Much Sun is Full Sun?
Just because nasa open area or bakuran ang plants, that doesn't mean full sun na agad sila po :) FYI
TERMS:
DIRECT SUNLIGHT
- diretsong nasisinagan ng sikat ng araw
INDIRECT/BRIGHT LIGHT
- usually reflected light na nanggagaling sa mga dingding (lalo na ang white walls), mirrors, tiles
-maliwanag na area, usually windowsills
FILTERED LIGHT
-light that passes through something that softens the intensity of the light like netting, or a tinted window
DAPPLED SHADE
-areas that receive changing sunlight throughout the day due to the shining of the sun through leaves of trees
SHADE
-in full shadow
*You have to take note of the movement of the sun throughout the day sa garden ninyo. The sun moves and the angle of sunlight also changes. If may walls kayo there will be time when the wall will form an overcast shadow. Count the number of hours na direct ang sikat ng araw. a lot of times, you will be surprised to find out na minsan kulang pa sa 4 hours ang direct sunlight ninyo :)
Also if your CnS are on racks, they would most definitely be covered by shadow after the sun reaches a certain point sa sky. Most likely by afternoon, yung nasa tuktok na lang ang naaarawan at yung iba nasa shade na dahil sa shadow ng racks.
DURATION:
FULL SUN -gets at least 6 hours of DIRECT light. Bright light the rest of the day
PARTIAL SHADE 3-6 hours of DIRECT light from morning to early afternoon sun
PARTIAL SUN 3-5 hours of DIRECT light from the morning sun only, shade in the afternoon
FULL SHADE 1-3 hours of DIRECT sun only, in shadow the rest of the day.
Info From Odie Pineda.
The Perfect Potting Mix - The Best Soil For Your Succulents
Thee most common question is "Ano ang soil mix ninyo?"
The answer, as it is in all aspects of gardening, is "Depende." (It depends).
Finding the right soil mix that works for you is important pero what works for one may not work for the other. I'll list down some common materials used for soil mixes, and hopefully from here, you can choose and mix your own ;) However, the first thing to know is the ID of your plant. Knowing the ID will help you in knowing how you can play around to make your own mix. The important thing to remember in general with CnS is they appreciate very good drainage but if you have too good of a drainage, the plant might not have been able to absorb the water by the time it dries up.
MINERAL
These are components that don't have humus or organic matter. The plants get their nutrients from the minerals dissolved in the components themselves. The following are considered mineral components for soil mixes (na common sa atin)
-PUMICE
most popular component. Made from a stone that is naturally filled with air bubbles making it light and fast-draining. Used to give superior drainage in mixes. Comes in different sizes, the bigger the size, the faster it drains.
-VERMICULITE
another popular component that could be a good substitute for pumice. However, vermiculite acts as a sponge holding in a little bit of water inside. A very good medium for seed starting as the moisture retention is excellent without making the soil soggy
-SCORIA (Lava rocks)
comes in variety of colors depending on the dissolved mineral content. Provides superior drainage as well like Pumice since it also has trapped air inside it but it is slightly more dense. Most common has high iron content making it red.
-MARBLE CHIPS
Usually used as the toppings on planters, it actually traps moisture beneath it and reflects light. It absorbs heat in the morning and radiates the heat at night. Could be a good topping for plants in colder areas.
-RIVER SAND/ SAND
a coarse mix of worn out rocks. Provides good drainage. Considered sometimes as coarse sand.
Do not use beach sand as this might have too much dissolved salt.
-SILT
the fine sand in rivers or bottom of ponds. Holds moisture and has a good mix of minerals.
-CLAY
soil that has the finest particles. Used to make clay pots. Has superior moisture holding capacity and is very compact. Red clay has a high Iron content. Some of the soils coming from Baguio has red clay. Akadama soil is a type of Clay found in Japan
-DIATOMACEOUS EARTH
Fossilized shells of diatoms from prehistoric times. This is used in mixes to provide a physical protection from ants as the microscopic shells wound ants.
ORGANIC
Materials coming from living organisms.
-HUMUS/COMPOST
most popular garden soil type which is usually a mixture of decayed plant and animal products. Excellent moisture retention and High nutrient content, mostly Nitrogen.
-VERMICOMPOST
similar to Humus but is a byrpoduct of earthworm turnings/castings.
-RICE HULL
provides good drainage and aeration but is very loose, however,it has little nutrient content as it has not decomposed.
-CARBONIZED PLANT MATERIAL
provides good drainage and aeration, has more easily accessible nutrient content than plain rice hull. High in Phosphorus and Magnesium. Usually is a common component of soi-less potting mixes.
-COCO PEAT/COIR
a nature-friendly substitute to Peat Moss. Has superior moisture retention and High Potassium Content.
-PEAT MOSS
harvested from swamp lands, this makes soil slightly acidic and provides superior moisture retention. It is however found, to be not environment-friendly. (CnS prefer slightly acidic soil)
A good mix includes components that provide drainage and moisture retention. The percentage should be based on your microclimate. If it is very humid in your area, a mixture with less moisture retention is better while if it is a very dry area, more moisture retention is needed.
Experiment with your own potting mix whether it be pure mineral or a mix.
Sunday, March 11, 2018
Basics in Growing Lithops
Many, especially beginners, make mistakes of growing lithops. They tend to eventually dry out. Many say that their lithops just explode, or melt.
To prevent those incidents, and to give your Lithops the longest life (they say Lithops lives over 30 years), follow these basic Lithops growing guidelines.
Basic Lithops Growing Guidelines
- Stop watering after flowering.
- Start watering after the old leaves completely dry. (In the Philippines, it could be any month, but expect the leaves to dry in late January to Early February when the cool season is leaving and the summer is coming in).
- Water freely during the growing season (summer). Soak the compost fully but allow it to dry out between waterings, no water when cold.
- Some growers fertilize frequently, some hardly ever.
- Keep them dry during the cold and rainy season (this starts in late May or early June, until late January of the following year - Philippine climate calendar).
- This plant is best for a well lit area (Bright shade to full sun). But don't be afraid even the best growers have plants that mysteriously dry up, or leave during the night.
Saturday, March 10, 2018
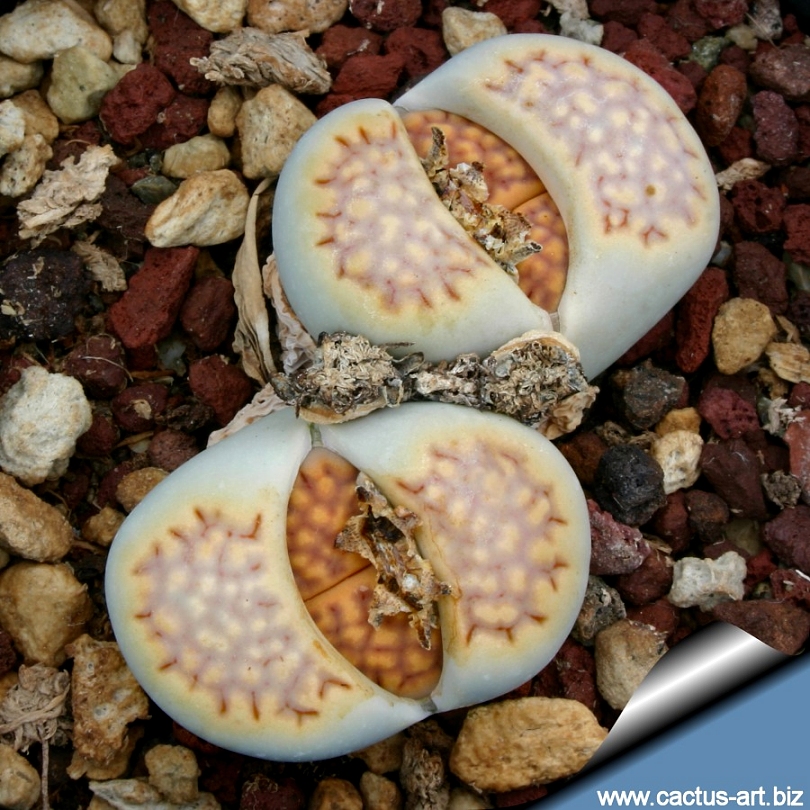
Lithops hallii "salicola reticulata"
 |
| Photo from Lithops.info Lithops hallii v. hallii 30 km SE of Hopetown, South Africa |
L. hallii is one of the most variable white flowering species related and often synonymized to Lithops julii (including Lithops fulleri). This is a nice plant with a delicate pastel-chartreuse colours. Furthermore it shares several characteristics with Lithops hookeri and Lithops salicola. This plant clumps up quickly and forms small clumps with up to 6 or more heads. It is relatively easy to manage like that where many other species would quickly kill themselves. Some people consider it one of the most tolerant of overwatering.
Desmond Cole field number C087: This population distinguishes for having reddish-brown leaves with broad interlacing network of windows with mostly small islands and fairly distinct irregularly dentate margins.
Family: Aizoaceae (ay-zoh-AY-see-ee)
Genus: Lithops (LY-thops)
Species: hallii (HALL-ee-eye)
Cultivar: Salicola Reticulata
Origin and Habitat: South africa, Cape Province.
TL: 30 km South-East of Hopetown, South Africa., 30 miles South of Prieska.
TL: 30 km South-East of Hopetown, South Africa., 30 miles South of Prieska.
Habitat: Grows on a white and arid flat limestone formation. Grows mainly on flat limestone terrains, with calcrete stones and fine-grained dark sandstone.
Synonyms:
Lithops hallii C087 (syn. salicola reticulata) TL: 30 km SE of Hopetown, South Africa
Lithops salicola var. reticulata C087 (syn. Lithops hallii ) TL: 30 km SE of Hopetown, South Africa
Lithops hallii var. salicola
Lithops hallii var. hallii
Lithops salicola var. reticulata
Category:
Cactus and Succulents
Foliage Color:
Colours of the backgrounds yellow-brown, grey-brown, grey-white, grey, brown, with some red, black; yellow or grey-brown.
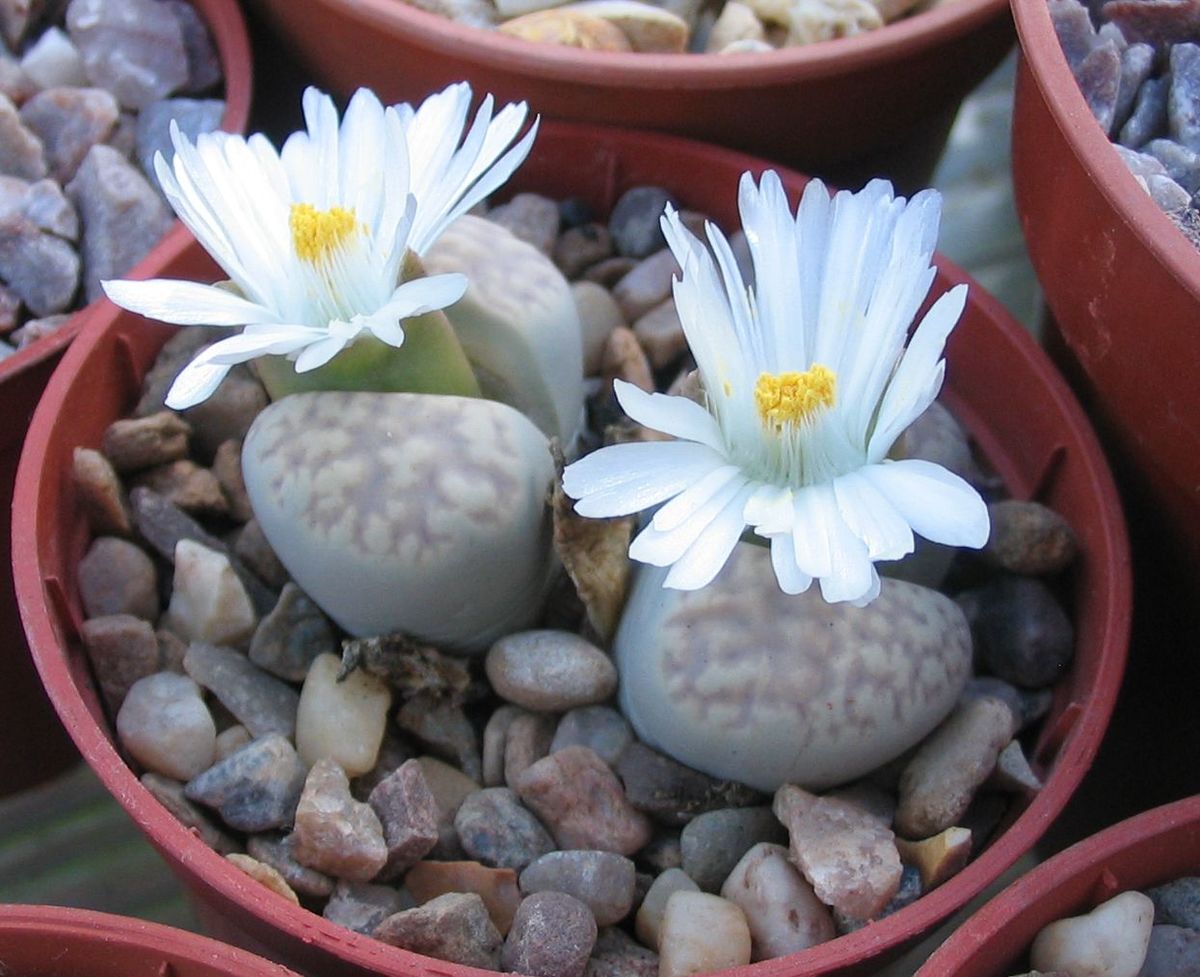
Bloom Characteristics:
The blooms are white 20-45 mm in diameter.
Water Requirements:
Drought-tolerant; suitable for xeriscaping
Average Water Needs:
Water regularly; do not overwater
Where to Grow:
Suitable for growing in containers
This plant is suitable for growing indoors
Height:
under 6 in. (15 cm)
Spacing:
3-6 in. (7-15 cm)
Hardiness:
USDA Zone 10a: to -1.1 °C (30 °F)
USDA Zone 10b: to 1.7 °C (35 °F)
USDA Zone 11: above 4.5 °C (40 °F)
Sun Exposure:
Sun to Partial Shade
Light Shade
Partial to Full Shade
Danger:
N/A
Bloom Color:
White
Bloom Time:
Mid Fall
Late Fall/Early Winter
Foliage:
Grown for foliage
Smooth-Textured
Succulent
Soil pH requirements:
6.6 to 7.5 (neutral)
7.6 to 7.8 (mildly alkaline)
7.9 to 8.5 (alkaline)
8.6 to 9.0 (strongly alkaline)
Patent Information:
Yet to be known
Propagation Methods:
From seed; winter sow in vented containers, coldframe or unheated greenhouse
From seed; sow indoors before last frost
From seed; direct sow after last frost
Need an open mineral, fast draining mix and the maximum amount of light you are able to give them. The basic cultivation routine is: Stop watering after flowering. Start watering after the old leaves completely dry. (Usually late March or Early April) Water freely during the growing season, soak the compost fully but allow it to dry out between waterings, no water when cold. Some growers fertilize frequently, some hardly ever. Keep them dry during the winter. Nearly all problems occur as a result of overwatering and poor ventilation especially when weather conditions are dull and cool or very humid. This plant is best for a well lit area (Bright shade to full sun). But don't be afraid even the best growers have plants that mysteriously dry up, or leave during the night.
Need an open mineral, fast draining mix and the maximum amount of light you are able to give them. The basic cultivation routine is: Stop watering after flowering. Start watering after the old leaves completely dry. (Usually late March or Early April) Water freely during the growing season, soak the compost fully but allow it to dry out between waterings, no water when cold. Some growers fertilize frequently, some hardly ever. Keep them dry during the winter. Nearly all problems occur as a result of overwatering and poor ventilation especially when weather conditions are dull and cool or very humid. This plant is best for a well lit area (Bright shade to full sun). But don't be afraid even the best growers have plants that mysteriously dry up, or leave during the night.
Seed Collecting:
Allow pods to dry on plant; break open to collect seeds
Allow seedheads to dry on plants; remove and collect seeds
Properly cleaned, seed can be successfully stored
Other details:
After flowering in the autumn, and extending through winter season the plant doesn’t need watering, but they will still be growing, the new bodies will be increasing in size extracting water from the outer succulent leaves, allowing them to shrivel away. The plant in this time extracts water and nutrient stored in the outer succulent leaves, allowing them to dehydrate relocating the water to the rest of the plant and to the new leaves that form during this period until the old leaves are reduced to nothing more than "thin papery shells".

 |
| Lithops salicola var. reticulata C087 (syn. Lithops hallii ) TL: 30 km SE of Hopetown, South Africa (Lithops hallii C087 (syn. salicola reticulata) TL: 30 km SE of Hopetown, South Africa) Photo by: Valentino Vallicelli |
 |
| Lithops hallii Gelkop from cactus-art.biz |
 |
| Lithops Hallii Gelkop from cactus-art.biz |
 |
| Lithops halli C087 Syn: L. salicola "reticulate" |
Coming Soon in my Lithops Collection
These Lithops varieties will come next month as seeds.


Lithops hallii "salicola reticulata"

Lithops julii

Lithops marmorata

Lithops hookeri v. hookeri
Seed orders will be open soon in the Philippines.
Wednesday, March 7, 2018
Germinating Lithops Seeds Days 11 and 12
I wasn't able to take some photos for these days. My busy schedule didn't allow me. But I will take pictures of Day 13th.
I am still at 12% germination rate, though there are some varieties of lithops that grow faster.
I have sown a new batch of 20 lithops seeds today, and I realized that my first batch of seeds that I am taking pictures of everyday, have grown 10 to 20 times its size.
The lithops seeds are extremely tiny, and you wouldn't want to exhale air over them because they are no bigger than an ant's footprint if they have any. You would mistake it for dust.
I will have a new batch of seeds coming next month, and I am so excited to sow them. Seeds will be for sale soon.
I will share my Day 13 pictures tomorrow.
Beginner Tips For Growing Lithops
The main issue with lithops is people overthink them. They require little watering throughout the year.
Don't water them once they begin to split as they are drawing water from the old leaves to fuel the growth of the new ones.
Once split, the plants should only be watered once you begin to see ample lines forming along the sides of the plant.
Sunlight, I keep mine under filtered light via shade cloth with full to partial sun in the morning or late afternoon, early evening. Don't put them out under full sun, they will burn.
Don't let them sit out below the mid 40's, cold AND wet is a basically a death sentence.
You WILL kill lithops as a beginner so get used to it. Start off with some basic specimens, ge the hang of their care, them move up to more exotic species and or clumps the more practice you get.
When you begin to see lines forming along the sides that's generally a good sign they're ready to be watered. For Gods sake, don't overdo it either. One good soaking every week and a half to two weeks is enough.

(Photo from Dan Curran)
Pot your lithops in a fast draining potting mix, I reccomend a ratio of 70% pumice to 30% cactus soil with some sand and a little coarse gravel.
These plants are adapted to be living water tanks. The longer they sit in wet soil, the longer they will absorb water until they simply start to melt down. You want a mixture which retains enough to give them what they need without being too wet for long periods.
Tuesday, March 6, 2018
Germinating Lithops Seeds Day 10
On my 10th day of how to grow lithops from seeds, it didn't seem like something is happening.
I left the seed container under the direct noon time sun yesterday for about an hour. We have daytime cloudy weather today, and sometimes the sun hides behind the clouds so it is not always direct sunlight. But when I touched the seed container, it was hot.
If it was just regular afternoon or morning sunlight, when you touch the moist container from the outside, it will feel cold that is coming from the inside of the container- like the inside of the container stays cooler than outside temperature because of the water and moisture trapped inside. The moisture keeps the seeds cool during daytime. The seeds need to be within 20 to 25 degrees celsius temperature. The water inside the container keeps the seeds cool, so it is important not to leave the seedbox under the noontime sun. Just place the container in a well-lit place.


I am still at 12% gernination rate for this batch of lithops. Hopefully, the almost sprouting seeds will sprout on Day 11.
The seedlings grow fast. They look more like infant lithops now. 4 out of the 6 seedlings sprouted standing up - with the pointed end downwards, like in th picture below.

There are 2 sprouts that are like lying down. I am waiting if they will stand up soon or just lay down like that.

Monday, March 5, 2018
Germinating Lithops Seeds Day 9
When you are growing the lithops seeds, you know they are about to germinate or sprout when the seeds become very, very pointy at one end. The pointed end is where it will sprout its first greens.
On my 9th day of how to grow lithops from seeds, I reached my 12% germination rate. That is 6 out of 50 seeds already germinated.
These seeds are from South Africa.
Check out the Day 9 photos below. The close-up photos show the very pointy seeds that are about to sprout.
I try to take photos from the same angle and distance as much as possible for comparison. Some seeds have moved when I added water. I noticed that the cotton is drying up and there is less water droplets in the afternoon, so I add about 2-3 tablespoons water on the sides only.


Saturday, March 3, 2018
Germinating Lithops Seeds Day 8
There are now 4 seedlings. Yehey! I officially have an 8% germination rate from the lithops seeds that came all the way from South Africa.
I think I am going to start my second batch of lithops at day 14 when most of my seeds are germinated.
Here's the latest seed. My seedling number 4. I noticed that the pointy part of the lithops seeds point outwards further, and that is where it sprouts. Today, I noticed that most of my seeds are more pointy.
The latest seedling has a light brownish sprout, unlike the first three sprouts. I have mixed lithops seedlings so the differences in the color and length of time of germinating is normal.

Here are the rest of the photos.


The germinated seeds sprout downwards.


Friday, March 2, 2018
Germinating Lithops Seeds Day 7
I am so excited today because I found 2 new sprouts. When the sprouts grow, they grow fast. I enjoyed seeing my lithops seeds sprout.
Lithops seeds are mostly tear-shaped. On the pointed end of the lithops seeds is where it sprouts. I am watching out for more sprouts, but I can only visibly see 3 lithops sprouts today.
There is more dusts today, and I added a few drops of water because most of the water from my first day already evaporated. And lithops seeds love water! But do not put in too much or the seeds will flow away. The added water almost floated away a couple of my seeds, but I managed to put them back by flowing them back to the middle of the cotton. So the photos today may look slightly different from the previous days' photos.


Germinating Lithops Seeds Day 6
Yehey! On day 6 of germinating my lithops seeds (in the Philippines), only one seed germinated - the one that sprouted on the previous day. But the new seedling grew. Oooh this one is a fast grower. It is sooo green.
I did not fret much because, like people and flowers, some lithops sprout early, and some are late. The seeds are viable upto 10 years, so we have around 9 more years to wait for these to turn into beautiful lithops.
One thing I noticed today is that dust-like particles seem to have appeared on the cotton. I'm not sure if these are dusts or bacteria, because some bacteria look like dusts. They are very few so I just ignored.
Here are my day 6 photos.


Wednesday, February 28, 2018
My First Sprouted Lithops
I officially have a seedling!
Day 5 on germinating my lithops seeds, there weren't any very big changes this morning. I even blogged on my Day 5 that "walang nangyayari". But this afternoon when I checked, and as I looked closer, I saw a tiny green speck.
Yehey! Yahoo!
So, on Day 5, the lithops seeds will start to sprout. Hopefully, tomorrow, there will be more than one sprouted seeds.


Tuesday, February 27, 2018
Lithops Amicorum
Lithops amicorum is a small desert succulent plant with white flowers. They are usually 10-15 millimeters in diameter. It was named for the group of four friends who discovered it. It was collected by Desmond T. and Naureen A. Cole on 3 May 2004.
By Lithopsian - Own work, CC BY-SA 4.0, Link

By Lithopsian - Own work, CC BY-SA 4.0, Link
How To Determine The South-Facing Window
They always say that the best location for plants is a south-facing window, or south-facing location.
The sun goes up on the east here in the Philippines. It is actually a bit southeast, but not very south. So, I think, the most ideal location for plants here in the Philippines is a southeast facing window where the sun isn't direct but it is toucing the plants early in the morning.
You can put the plants under a roof, so when it is noon time, the plants are not directly under the sun. But still, in the morning, the plants get touched by the cooler sun rays.
If you don't have a southeast facing window, an east window or a south window is good.
Even a northeast window is good. As long as the plants get touched by the morning sun, that is good. But northeast doesnt get as much morning sun as in the southeast.
I downloaded a compass app (there are many in the Google playstore) and located all my southfacing windows.
We are in a tropical country where sun is good for plants from morning to afternoon, as long as it is not the noontime sun.
Afternoon sun is still sun, but not as intense as the morning sun. Afternoon sun is cooler than morning. But the morning sun wakes the plants up from night coolness, and the temperature change could be the most beneficial for them.

Germinating Lithops Seeds Day 4
It seems that there isn't much change with Day 3 and 4. However, if you look at the actual seeds closely, they seemed to have lightly changed in color, and got a bit bigger than yesterday. The seeds became lighter in color, like light brown.


I am just using my cellphone and LED lights so the pictures aren't very clear like when you use professional cameras.
Germinating Lithops Seeds Day 3
I am posting the pictures day by day for my own satisfaction.
It seems that there isn't much change today. If you are very observant, you will notice there are a super very tiny change, hardly noticeable.
Patience is the key to success in growing lithops.


Germinating Lithops Seeds Day 2
On the second day of my lithops seeds. There is a very tiny progress.


I placed the container with seeds on the southeast facing window to catch some morning sun, then i transfer the container with seeds on the south facing window before noon time because i don't want them to get baked by the scorching sun.
I made sure that they get plenty of indirect sunlight. I use a light meter app (pic below) to measure the light intensity my plants are getting. I make sure that the light does not get at 20,000lux which is direct sunlight. Just below 5000lux just like morning sun.
At night, I place the seeds under an artificial light with lux below 2000. I want the seeds to receive as much light as possible.

Germinating Lithops Seeds Day 1
This is the first day of my lithops seeds. These are what I used for germinating.

A Face Mask so I won't breath over the very tiny lithops seeds because they might just get accidetally blown away.

Lithops Seeds, a toothpick, cotton pads or unrolled cotton balls.

Container and a Tissue to place the seeds before putting on the cotton.

Container with cover. Then place the cotton inside.

A small bottle for water. Then fully wet the cotton balls very wet.

Then place the seeds one by one on top of the cotton using the tooth pick to pick up the seeds.


These are Day 1 pictures.
Subscribe to:
Comments (Atom)